How To Create Movie App UI Using HTML & CSS
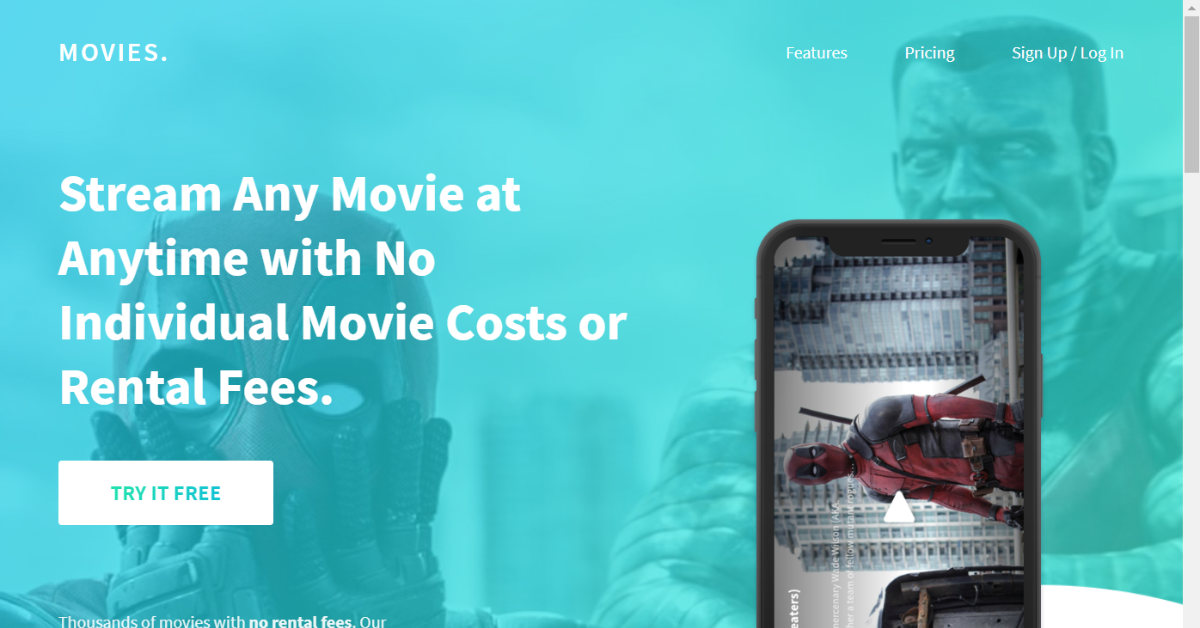
Dear Coders! I’ll show you how to create a Movie Website UI using HTML and CSS. This is a beginner project we will be creating a movie app in which there is numerous movie in form cards. You just guys need to follow through with our article and we will be helping you guys in creating your own movie App UI.
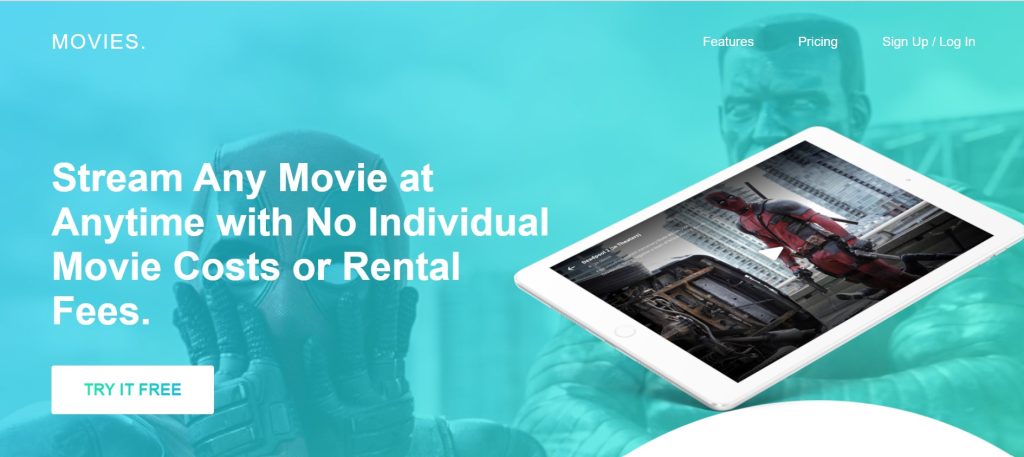
Movie websites and movies themselves both aim to delight their viewers. A website must satisfy visitors’ demands while also offering them some enjoyment in order to capture their attention and persuade them to watch the film. With today’s movie websites, choosing which film to see may be done quickly by taking a few minutes to watch a few trailers.
Prerequisites:
- index.html — contains the HTML layout which defines the element structure that would be shown on the page.
- style.css contains CSS code for styling. Using CSS, we can style the different portions to make them more visually appealing.
I hope you have a general idea of what the project entails. In our article, we will go over this project step by step.
Step1: Adding HTML Markup
<!DOCTYPE html>
<html lang="en">

<head>
    <meta charset="UTF-8" />
    <meta http-equiv="X-UA-Compatible" content="IE=edge" />
    <meta name="viewport" content="width=device-width, initial-scale=1.0" />
    <link rel="stylesheet" href="style.css" />
    <title>Movie App</title>
</head>

<body>
    <header>
        <nav>
            <a href="#" class="logo">MOVIES.</a>
            <ul class="desktop">
                <li><a href="#">Features</a></li>
                <li><a href="#">Pricing</a></li>
                <li><a href="#">Sign Up / Log In</a></li>
            </ul>
            <div class="mobile">
                <label for="toggle">☰</label>
                <input type="checkbox" id="toggle">
                <ul>
                    <li><a href="#">Features</a></li>
                    <li><a href="#">Pricing</a></li>
                    <li><a href="#">Sign Up / Log In</a></li>
                </ul>
            </div>
        </nav>

        <h1>Stream Any Movie at Anytime with No Individual Movie Costs or Rental Fees.</h1>
        <div class="btnGroup">
            <a href="#" class="btnWhite">TRY IT FREE</a>
            <div class="whiteBG"></div>
        </div>

        <p>Thousands of movies with <b>no rental fees</b>. Our <br />monthly plan gives you unlimited access to our
            <br />movie library.</p>
        <p><b>Forget the theaters!</b> Exclusive access to <br />movies in theaters on release date.</p>
        <img src="http://swingsetimagination.com/practice_web_moviesite/img/ipad-pro.png" alt="ipad" class="ipad">
        <img src="http://swingsetimagination.com/practice_web_moviesite/img/iphone.png" alt="iphone" class="iphone">
    </header>

    <section class="new4KMovies">
        <div class="sectionTitle">
            <h2>NEW 4K MOVIES</h2>
            <a href="#" class="btnGreen">VIEW MORE</a>
        </div>
        <ul>
            <li><a href="#"><img src="http://swingsetimagination.com/practice_web_moviesite/img/1.png"
                        alt="movie poster"></a></li>
            <li><a href="#"><img src="http://swingsetimagination.com/practice_web_moviesite/img/2.png"
                        alt="movie poster"></a></li>
            <li><a href="#"><img src="http://swingsetimagination.com/practice_web_moviesite/img/3.png"
                        alt="movie poster"></a></li>
            <li><a href="#"><img src="http://swingsetimagination.com/practice_web_moviesite/img/4.png"
                        alt="movie poster"></a></li>
        </ul>
        <ul>
            <li><a href="#"><img src="http://swingsetimagination.com/practice_web_moviesite/img/5.png"
                        alt="movie poster"></a></li>
            <li><a href="#"><img src="http://swingsetimagination.com/practice_web_moviesite/img/6.png"
                        alt="movie poster"></a></li>
            <li><a href="#"><img src="http://swingsetimagination.com/practice_web_moviesite/img/7.png"
                        alt="movie poster"></a></li>
            <li><a href="#"><img src="http://swingsetimagination.com/practice_web_moviesite/img/8.png"
                        alt="movie poster"></a></li>
        </ul>
    </section>

    <section class="callToAction">
        <h1>Watch your favorite movies and explore similar titles. Get Started today for <span>$5.99</span>/month.</h1>
        <a href="#" class="btnColor">GET STARTED</a>
    </section>
    <footer>
        <div class="copy">
            <a href="#" class="logo">MOVIES.</a>
            <p>©2018 Movie Website, LLC.</p>
        </div>
        <ul>
            <li><a href="#"></a>Account</li>
            <li><a href="#"></a>Help Center</li>
            <li><a href="#"></a>Terms</li>
            <li><a href="#"></a>Privacy</li>
        </ul>
    </footer>

</body>

</html>
Every website has three sections: the header, the main body, and the footer. In our project, we will use the same procedure; we will build a header section where we will add the heading, and we will add the main content inside the main section.
5+ HTML CSS Projects With Source Code
Header Section
We will design the primary container for our movie website first. Then, we’ll add a navbar to our header using the <header> element. We are going to include a logo on our gastronomic website using the <nav> tag in the top. After that, we’ll create a list of menu items to add to the navbar using the unordered list. Two navbars will be built, one for screens as large as desktops and one for screens as small as smartphones.
The <h1> element will now be used to give the header section a heading, and the a> tag will be used to create a button for the free movie streaming. We’ll use the <p> element to add some text to our header section as well. A website is more visually appealing when it contains photos and video, so we’ll be adding two images to our header using the img tag. The first is for a big screen, like a desktop computer, while the second is for a small screen, like a phone.
Body Section:
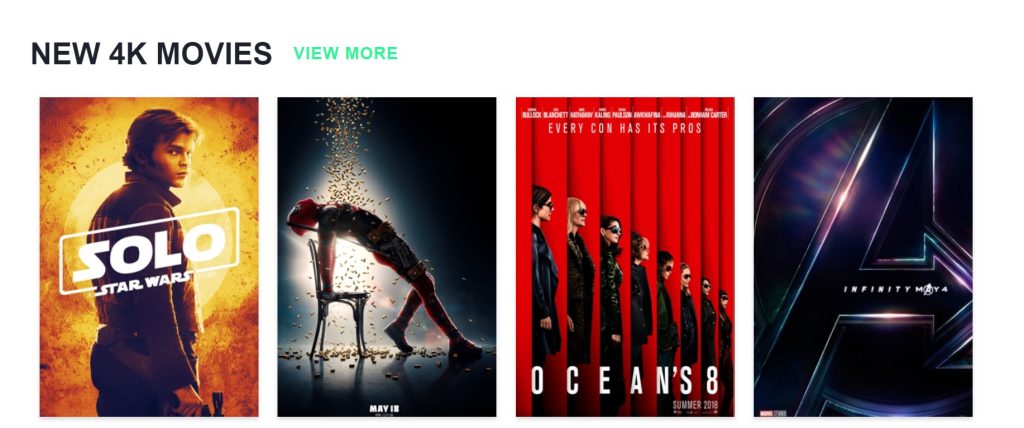
Now, inside of our div tag, using the div tag with class “sectionTitle,” we will add a header using the <h2> tag and a “see more” button to access further videos. Now for the main part, we will be adding the photos of various movies. To do this, we will build an unordered list, inside of which we will make the linked images by utilising the image and anchor tags.
Then, using some fundamental HTML tags, we’ll add some information and describe how a person can begin using our website.
Footer Section:
We will build a footer section with the footer tag and a div> section with the <div> tag. We will add the copyright icon and copyright content using the © tag, and the name of the person who designed the website using the <p> tag and using the unordered list we will add some additional link for the website policy
Let’s have a look at our webpage now that we’ve added structure.
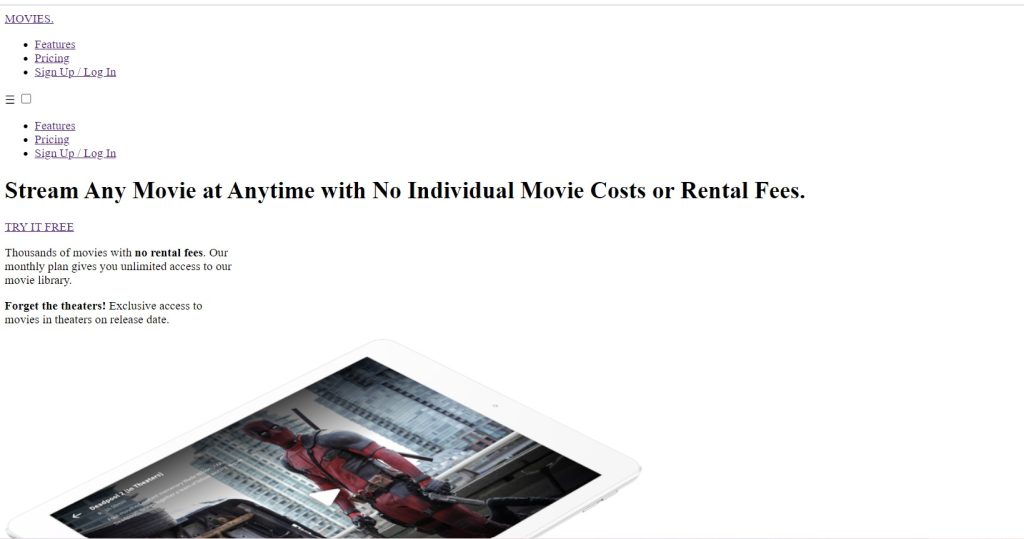
Step2: Adding CSS Code
Cascading Style Sheets (CSS) is a markup language for describing the presentation of a document written in HTML or XML. CSS, like HTML and JavaScript, is a key component of the World Wide Web.
Now we will look at our CSS code.
/* ----GLOBAL-----*/

* {
  margin: 0;
  padding: 0;
  border: 0;
  outline: 0;
  font-size: 100%;
  vertical-align: baseline;
}

:root {
  --main-black: #1e202b;
  --main-blue: #08aeea;
  --main-green: #2af598;
  --main-gradient: linear-gradient(
    to right,
    var(--main-blue),
    var(--main-green)
  );
}

html {
  font-family: Source Sans Pro, sans-serif;
}
body {
  width: 100%;
  background-color: white;
}

h1 {
  font-size: 48px;
  font-weight: 700;
  color: var(--main-black);
}

h2 {
  font-size: 36px;
  font-weight: 700;
  color: var(--main-black);
}

p,
li {
  font-size: 16px;
  font-weight: 400;
  color: var(--main-black);
}

.btnWhite {
  display: inline-block;
  text-decoration: none;
  width: 200px;
  height: 60px;
  line-height: 60px;
  font-size: 20px;
  font-weight: 700;
  text-align: center;
  margin-bottom: 75px;
  background: #2af598;
  background: -webkit-linear-gradient(top left, #2af598, #08afea);
  background: -moz-linear-gradient(top left, #2af598, #08afea);
  background: linear-gradient(top left, #2af598, #08afea);
  -webkit-background-clip: text;
  -webkit-text-fill-color: transparent;
}

.btnGroup {
  position: relative;
  z-index: 1;
}
.whiteBG {
  background-color: white;
  display: block;
  height: 60px;
  width: 200px;
  position: absolute;
  z-index: -1;
  top: 0;
  border-radius: 3px;
}

.btnColor {
  display: inline-block;
  text-decoration: none;
  width: 200px;
  height: 60px;
  line-height: 60px;
  text-align: center;
  background-image: var(--main-gradient);
  color: white;
  font-size: 20px;
  font-weight: 700px;
  border-radius: 3px;
}

.btnGreen {
  color: var(--main-green);
  text-decoration: none;
  font-size: 20px;
  font-weight: 700;
  letter-spacing: 1px;
}

span {
  color: var(--main-green);
}

/* ----Header / Nav-----*/

nav {
  display: inline-block;
  width: 100%;
}
nav a {
  color: white;
  text-decoration: none;
  line-height: 100px;
}

nav a:hover {
  color: var(--main-black);
}
.logo {
  font-weight: 500;
  font-size: 25px;
  letter-spacing: 2px;
}

nav ul {
  float: right;
  list-style: none;
}

nav ul li {
  display: inline-block;
  margin-left: 50px;
}

header h1 {
  color: white;
  width: 55%;
  margin: 90px 0 40px 0;
}

header p {
  color: white;
  margin-bottom: 40px;
  opacity: 0.9;
}
header {
  background-image: url(http://swingsetimagination.com/practice_web_moviesite/img/header.png);
  background-repeat: no-repeat;
  background-position: center;
  background-size: cover;
  height: 100vh;
  min-height: 900px;
  width: 90%;
  padding: 0 5%;
}

.ipad {
  width: 50%;
  position: absolute;
  right: 0;
  bottom: 60px;
}

.iphone {
  width: 40%;
  position: absolute;
  right: 4%;
  top: 150px;
  display: none;
}

.mobile {
  display: none;
}

label {
  margin: 0 40px 0 0;
  font-size: 25px;
  color: white;
  cursor: pointer;
  position: absolute;
  top: 32px;
  right: 0;
}

#toggle {
  display: none;
}
.mobile ul {
  text-align: center;
  width: 100%;
  display: none;
  margin: 0;
  background-color: rgba(255, 255, 255, 0.1);
}

.mobile ul li {
  margin: 0;
  width: 100%;
  border-bottom: 1px solid rgba(255, 255, 255, 0.2);
}

#toggle:checked ~ ul {
  display: block;
}

/* ----New 4K Movies Section-----*/

.new4KMovies {
  width: 90%;
  padding: 0 5%;
  margin-bottom: 160px;
}

.sectionTitle h2,
.sectionTitle a {
  display: inline-block;
  vertical-align: middle;
}

.sectionTitle a {
  margin-left: 20px;
}

.sectionTitle {
  margin: 50px 0 20px 0;
}

.new4KMovies ul {
  width: 100%;
  display: flex;
  list-style: none;
}
.new4KMovies ul li img {
  width: 92%;
  margin: 4%;
  -webkit-box-shadow: 0px 3px 5px 0px rgba(0, 0, 0, 0.16);
  -moz-box-shadow: 0px 3px 5px 0px rgba(0, 0, 0, 0.16);
  box-shadow: 0px 3px 5px 0px rgba(0, 0, 0, 0.16);
}

/* ----Call to Action-----*/

.callToAction {
  text-align: center;
  width: 60%;
  margin: 0 auto 200px auto;
}

.callToAction h1 {
  margin-bottom: 40px;
}

/* ----Footer-----*/

footer a {
  text-decoration: none;
  color: var(--main-black);
}

footer ul {
  list-style: none;
  float: right;
}

footer ul li {
  display: inline-block;
  margin-left: 50px;
}

.copy a,
.copy p {
  display: inline-block;
  vertical-align: middle;
}
.copy p {
  margin-left: 20px;
}
footer {
  width: 90%;
  padding: 0 5%;
}
footer ul,
.copy {
  line-height: 80px;
  display: inline-block;
}

/* ----Responsive-----*/
@media only screen and (max-width: 1200px) {
  header {
    height: 100vh;
    min-height: 1000px;
  }
  header h1 {
    margin: 50px 0 40px 0;
  }
  .btnWhite {
    margin-bottom: 80px;
  }
  .callToAction {
    width: 90%;
  }
  .ipad {
    display: none;
  }
  .iphone {
    display: block;
  }
}

@media only screen and (max-width: 900px) {
  header h1 {
    width: 100%;
  }
  header {
    background-position: left center;
  }
  .iphone {
    display: none;
  }
  footer ul {
    float: none;
    display: block;
    text-align: center;
  }
  .copy {
    text-align: center;
    display: block;
  }
  footer ul li {
    margin: 0 25px;
  }
}

@media only screen and (max-width: 700px) {
  .new4KMovies ul {
    flex-direction: column;
  }
  .desktop {
    display: none;
  }
  .mobile {
    display: block;
  }

  nav ul li {
    margin: 0;
  }
  footer ul li {
    display: none;
  }
  h1 {
    font-size: 36px;
  }
}
We will go through each phase of how we added style to our movie website. You guys can either follow along or add your own flair.
Basic Styling:We’ll change the box-sizing property to “border-box” and the margin and padding from the default values to “zero” using the universal selector. Furthermore, the font size is set to “100%.”
Portfolio Website Using HTML CSS And JAVASCRIPT ( Source Code)
Now that we have defined colours within a pusedo class root, we will add it to our website.
In the same way, we will style our basic HTML heading and other elements. Using the body tag selector, we will set the width as “100%” and the background colour is set to “white.” Similarly, we will set the h1 tag’s font-size as 48 px and the font-weight as 700.
/* ----GLOBAL-----*/

* {
  margin: 0;
  padding: 0;
  border: 0;
  outline: 0;
  font-size: 100%;
  vertical-align: baseline;
}

:root {
  --main-black: #1e202b;
  --main-blue: #08aeea;
  --main-green: #2af598;
  --main-gradient: linear-gradient(
    to right,
    var(--main-blue),
    var(--main-green)
  );
}

html {
  font-family: Source Sans Pro, sans-serif;
}
body {
  width: 100%;
  background-color: white;
}

h1 {
  font-size: 48px;
  font-weight: 700;
  color: var(--main-black);
}

h2 {
  font-size: 36px;
  font-weight: 700;
  color: var(--main-black);
}

p,
li {
  font-size: 16px;
  font-weight: 400;
  color: var(--main-black);
}
Button Styling:
Now using the class selector (.btnwhite) we will set the display as “inline-block” and text-decoration is set to “none” and using the width and height as 200px and 60px and using the line-height property we will give a line height of 60px . Using the text-align property we will align the text to the center . We will set the background as linear gradient
.btnWhite{
  display: inline-block;
  text-decoration: none;
  width: 200px;
  height: 60px;
  line-height: 60px;
  font-size: 20px;
  font-weight: 700;
  text-align: center;
  margin-bottom: 75px;
  background: #2AF598;
  background: -webkit-linear-gradient(top left, #2AF598, #08AFEA);
  background: -moz-linear-gradient(top left, #2AF598, #08AFEA);
  background: linear-gradient(top left, #2AF598, #08AFEA);
  -webkit-background-clip: text;
  -webkit-text-fill-color: transparent;
}

.btnGroup {
  position: relative;
  z-index: 1;
}
.whiteBG{
  background-color: white;
  display: block;
  height: 60px;
  width: 200px;
  position: absolute;
  z-index: -1;
  top:0;
  border-radius: 3px;
}

.btnColor{
  display: inline-block;
  text-decoration: none;
  width: 200px;
  height: 60px;
  line-height: 60px;
  text-align: center;
  background-image: var(--main-gradient);
  color: white;
  font-size: 20px;
  font-weight: 700px;
  border-radius: 3px;
}

.btnGreen{
  color: var(--main-green);
  text-decoration: none;
  font-size: 20px;
  font-weight: 700;
  letter-spacing: 1px;
}

span {
  color: var(--main-green);
}
Navbar (Header Styling)
Now that the width is set to “100%,” the display is set to “inline-block,” and the font is changed to white using the tag selector (nav). Our navbar elements now have a hover property, and we’ve changed the colour to black. Our navbar is set to float right in position. We will embellish our header background with an image using the background picture.
The width and position will then be adjusted for the various devices using the class selector.
ADVERTISEMENT
/* ----Header / Nav-----*/

nav {
  display: inline-block;
  width: 100%;
}
nav a {
  color: white;
  text-decoration: none;
  line-height: 100px;
}

nav a:hover {
  color: var(--main-black);
}
.logo {
  font-weight: 500;
  font-size: 25px;
  letter-spacing: 2px;
}

nav ul{
  float: right;
  list-style: none;
}

nav ul li{
  display: inline-block;
  margin-left: 50px;
}

header h1{
  color: white;
  width: 55%;
  margin: 90px 0 40px 0;
}

header p{
  color: white;
  margin-bottom: 40px;
  opacity: 0.9;
}
header {
  background-image: url(http://swingsetimagination.com/practice_web_moviesite/img/header.png);
  background-repeat: no-repeat;
  background-position: center;
  background-size: cover;
  height: 100vh;
  min-height: 900px;
  width: 90%;
  padding: 0 5%;
}

.ipad {
  width: 50%;
  position: absolute;
  right: 0;
  bottom: 60px;
}

.iphone {
  width: 40%;
  position: absolute;
  right: 4%;
  top: 150px;
  display: none;

}

.mobile {
  display: none;
}

label {
  margin: 0 40px 0 0;
  font-size: 25px;
  color: white;
  cursor: pointer;
  position: absolute;
  top: 32px;
  right: 0;
}

#toggle {
  display: none;
}
.mobile ul {
  text-align: center;
  width: 100%;
  display: none;
  margin: 0;
  background-color: rgba(255, 255, 255, 0.1);
}

.mobile ul li {
  margin: 0;
  width: 100%;
  border-bottom: 1px solid rgba(255, 255, 255, 0.2);
}

#toggle:checked ~ ul {
  display: block;
}
ADVERTISEMENT
Movies Section:
ADVERTISEMENT
The width will now be set to 90% using the class selector (.new4KMovies), and the padding will be used to set the left and right padding to 5%. We’ll set the display to be inline-block using the display parameter.
ADVERTISEMENT
50+ HTML, CSS & JavaScript Projects With Source Code
ADVERTISEMENT
We’ll change the margin-left to 20px using the child selection (.sectionTitle a). Our undone list’s appearance is set to “flex” and its width to 100%. 92% of the image’s width is chosen.
/* ----New 4K Movies Section-----*/

.new4KMovies {
  width: 90%;
  padding: 0 5%;
  margin-bottom: 160px;
}

.sectionTitle h2, .sectionTitle a  {
  display: inline-block;
  vertical-align: middle;
}

.sectionTitle a {
  margin-left: 20px;
}

.sectionTitle {
  margin: 50px 0 20px 0;
}

.new4KMovies ul {
  width: 100%;
  display: flex;
  list-style: none;
}
.new4KMovies ul li img{
  width: 92%;
  margin: 4%;
  -webkit-box-shadow: 0px 3px 5px 0px rgba(0, 0, 0, 0.16);
  -moz-box-shadow: 0px 3px 5px 0px rgba(0, 0, 0, 0.16);
  box-shadow: 0px 3px 5px 0px rgba(0, 0, 0, 0.16);
}

/* ----Call to Action-----*/

.callToAction {
  text-align: center;
  width: 60%;
  margin: 0 auto 200px auto;
}

.callToAction h1 {
  margin-bottom: 40px;
}
Footer Section & Adding Responsiveness
Using the footer selection, we now alter the font’s colour to “black.” We will raise the font size by 14 pixels, the letter spacing by 1, and the padding by 5 pixels. Our unordered list’s float property will be set to float right.
The content of our movies website will automatically change if the browser screen size changes in accordance with the defined width. We will use the media query to set three maximum screen widths for various devices.
/* ----Footer-----*/

footer a {
  text-decoration: none;
  color: var(--main-black);
}

footer ul{
  list-style: none;
  float: right;
}

footer ul li {
  display: inline-block;
  margin-left: 50px;
}

.copy a, .copy p {
  display: inline-block;
  vertical-align: middle;
}
.copy p {
  margin-left: 20px;
}
footer {
  width: 90%;
  padding: 0 5%;
}
footer ul, .copy {
  line-height: 80px;
  display: inline-block;
}

/* ----Responsive-----*/
@media only screen and (max-width: 1200px) {
  header{
      height: 100vh;
      min-height: 1000px;
  }
  header h1{
      margin: 50px 0 40px 0;
  }
  .btnWhite{
      margin-bottom: 80px;
  }
  .callToAction {
      width: 90%;
  }
  .ipad {
      display: none;
  }
  .iphone{display: block;}
}

@media only screen and (max-width: 900px) {
  header h1{
      width: 100%;
  }
  header {
      background-position: left center;
  }
  .iphone {
      display: none;
  }
  footer ul {
      float: none;
      display: block;
      text-align: center;
  }
   .copy {
      text-align: center;
      display: block;
  }
  footer ul li{
      margin: 0 25px;
  }
}

@media only screen and (max-width: 700px) {
  .new4KMovies ul {
      flex-direction: column;
  }
  .desktop {
      display: none;
  }
  .mobile {
      display: block;
  }

  nav ul li {
      margin: 0;
  }
  footer ul li{
      display: none;
  }
  h1{
      font-size: 36px;
  }
}
Now we’ve completed our Movie website using HTML & CSS. I hope you understood the whole project. Let’s take a look at our Live Preview.
Output:
Codepen Preview Of MovieWebsite UI using HTML & CSS
Now We have Successfully created our Movie Website using HTML & CSS. You can use this project directly by copying into your IDE. WE hope you understood the project , If you any doubt feel free to comment!!
If you find out this Blog helpful, then make sure to search code with random on google for Front End Projects with Source codes and make sure to Follow the Code with Random Instagram page.
