Hello, Coders! In this article, we’ll look at how to make an age calculator in Javascript with your date of birth and additional functionality that shows you how much time you have until your next birthday. This project is built using JavaScript. To learn something new, you should use a more practical project, so we chose a simple age calculator to clear your concept.
Simple Age Calculator Using Javascript
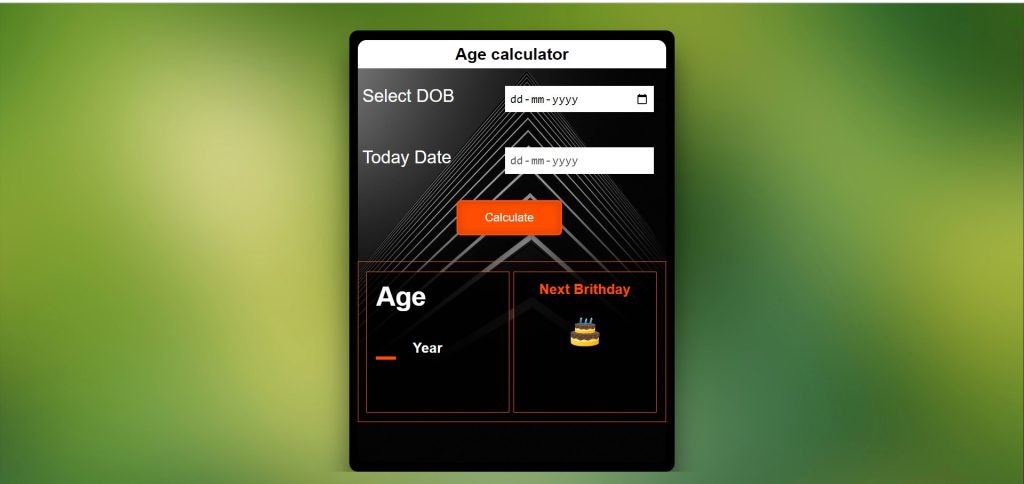
Let’s take a look at how our project will look.👇

I hope you must have got an idea about the project.
So, Let’s start our Age calculator Project By Adding the Source Codes. For That, First, We Are Using The Html Code.
Step1: HTML code for age calculator
HTML is used to design the website’s layout. So, first, we create the layout, then we style it, and finally, we add features to the button (on clicking the button menu opens ).
Now we’ll look at our HTML code.
<!DOCTYPE html>
<html lang="en">
    <head>
        <meta charset="UTF-8">
        <meta name="viewport" content="width=device-width, initial-scale=1.0">
        <title>Age Calculator</title>
        <link rel="stylesheet" type="text/css" href="style.css">
    </head>
    <body>
        <div class="container">
            <div class="main_div_container">
                <div class="main_screen_container">
                    <h3 class="hading_container">Age calculator</h3>
                    <div class="user_input_container">
                        <div class="dob_tile">Select DOB</div>
                        <input id="date" type="date" name="dob">
                    </div>
                    <div class="user_input_container">
                        <div class="date_tile">Today Date</div>
                        <input id="today_date" type="date" name="dob" disabled>
                    </div>
                    <button class="btn" onclick="ageCalculate()">Calculate</button>
                    <div class="age_main_big_container">
                        <div class="left_side_div_age_list">
                            <div>Age</div>
                            <div><b id="year">_</b> Year</div>
                            <div id="m_d"><b id="month">_</b> Months | <b id="day">_</b> Days</div>
                        </div>
                        <div class="right_side_div_age_list">
                            <div>Next Brithday</div>
                            <img src="https://i.pinimg.com/originals/ce/e2/85/cee2854c1ca3a12fe2655f3376b5c110.gif">
                            <div id="n_b"><b id="month1">__</b> Months | <b id="day1">__</b> Days</div>
                        </div>
                    </div>
                </div>
            </div>
        </div>
        <script type="text/javascript" src="index.js"></script>
    </body>
</html>- First and foremost, we will create a div container that will contain our calculator structure.
- We will now add the heading to our age calculator using H3 tags.
- Now we make a div with the label “select our date of birth” and input of type “birth” for selecting the date from a calendar.
- We will now display the current date using the same method input type=”date,” and we will disable the property that allows us to change the current date.
- Now we’ll create a button with the button tag and add the onClick function to it.
Now we’ll make a section with a div tag. The first will display your calculated age, and the second will display how much time you have until your next birthday and we have also added a birthday gif in our second section.
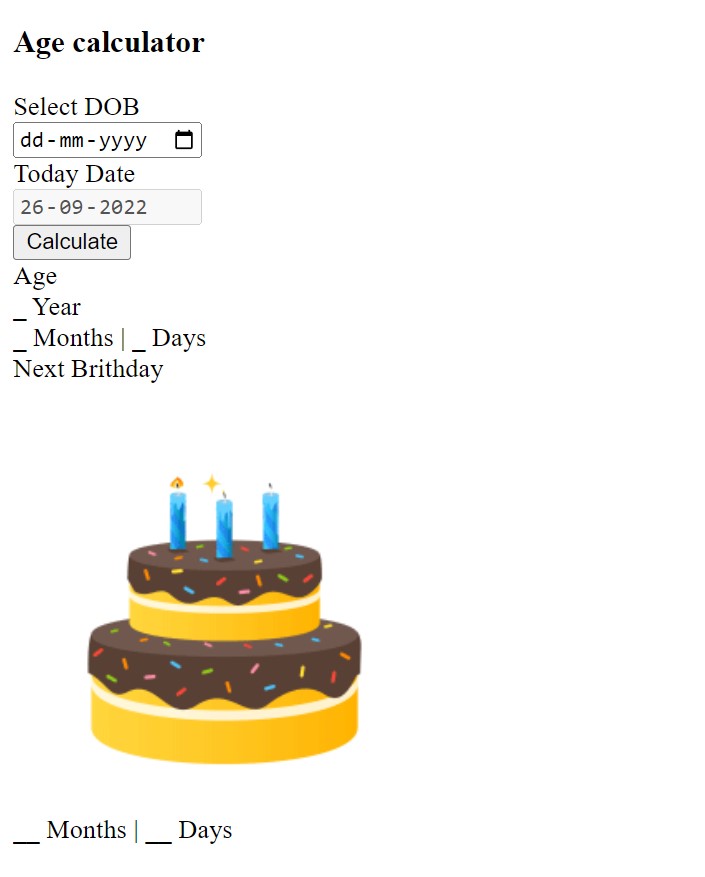
Let’s take a look at our HTML structure without any styling.

Step2: CSS code for age calculator
CSS is an abbreviation for Cascading Style Sheet. CSS will be used to style our webpage so that it looks appealing, and CSS is used to improve the user experience.
Now let’s take a look at our CSS code.
*
{
    margin: 0;
    padding: 0;
  overflow: hidden;
}

html,body
{
    width: 100%;
    height: 100%;
}

body
{
    font-family: arial;
    background-image: url(https://www.teahub.io/photos/full/8-80224_blur-image-for-youtube.jpg);
    background-size: cover;
}

.container
{
    padding-top: 1px;
}

.main_div_container
{
    width: 370px;
    height: 500px;
    margin: auto;
    margin-top: 30px;
    padding-top: 1px;
    border-radius: 10px;
    background-color: #000;
    box-shadow: 0px 25px 30px rgba(0, 0, 0, 0.5);
}

.main_screen_container
{
    width: 350px;
    height: 480px;
    margin: auto;
    margin-top: 10px;
    border-radius: 10px;
    background-image: url(https://images.unsplash.com/photo-1515462277126-2dd0c162007a?ixlib=rb-1.2.1&ixid=MnwxMjA3fDB8MHxzZWFyY2h8MXx8ZGFyayUyMHRoZW1lfGVufDB8fDB8fA%3D%3D&w=1000&q=80);
    background-size: cover;
    overflow: hidden;
}

.hading_container
{
    background: #fff;
    text-align: center;
    padding: 5px 0;
}

.user_input_container
{
    width: 95%;
    padding: 20px 5px;
    color: #fff;
    font-size: 20px;
}

.dob_tile,.date_tile
{
    width: 47%;
    display: inline-block;
    vertical-align: top;
}

#date,#today_date
{
    width: 48%;
    height: 20px;
    padding: 5px;
    border: none;
    background-color: #fff;
    display: inline-block;
    vertical-align: top;
}


.btn
{
    width: 120px;
    padding: 10px;
    margin-top: 10px;
    margin-left: 32%;
    border: none;
    cursor: pointer;
    border-radius: 5px;
    color: #fff;
    background-color: #ff4e00;
    border: 2px solid #ff4e00;
    box-shadow: 0px 0px 10px rgba(0, 0, 100, 0.2), inset 0px 0px 10px rgba(0, 0, 100, 0.2);
    transition: all 0.2s;
}

.btn:hover
{
    box-shadow: 0px 0px 10px rgba(0, 0, 100, 0.4), inset 0px 0px 10px rgba(0, 0, 100, 0.2);
}

.btn:active
{
    box-shadow: 0px 0px 10px rgba(0, 0, 100, 0.2), inset 0px 0px 10px rgba(0, 0, 100, 0.4);
    transform: scale(0.99);
}


/********************************/

.age_main_big_container
{
    width: 94.5%;
    height: 160px;
    margin-top: 30px;
    border: 1px solid #ff4e00;
    padding: 10px 2.5%;
    font-weight: bold;
}

.left_side_div_age_list,.right_side_div_age_list
{
    width: 49.1%;
    height: 100%;/*
    background: green;*/
    color: #fff;
    border: 1px solid #ff4e00;
    box-sizing: border-box;
    display: inline-block;
    vertical-align: top;
    background-color: rgba(0, 0, 0, 0.7);
}

.left_side_div_age_list div:nth-child(1)
{
    font-size: 30px;
    padding: 10px;
}

.left_side_div_age_list div:nth-child(2)
{
    margin: 0;
}

.left_side_div_age_list div:nth-child(3)
{
    margin: 20px 4px;
    opacity: 0;
    transition: all 0.2s;
}

.right_side_div_age_list
{
    text-align: center;
}

.right_side_div_age_list div:nth-child(1)
{
    color: #ff4e00;
    padding: 10px 0;
}

.right_side_div_age_list #n_b
{
    margin-top: 26px;
    opacity: 0;
    transition: all 0.2s;
}

.right_side_div_age_list img
{
    width: 50px;
}

#year
{
    font-size: 40px;
    color: #ff4e00;
    margin: 10px;
    margin-right: 15px;
}

#month
{

}

#day
{

}
Now that we’ve included our CSS code in our article, let’s go over it step by step.
Step1: We will use the universal selector to set the padding and margin to zero and the overflow property to hidden to hide excessive content flow.
Using the body tag we will add the width and height as 100%. We have also added the font-family as “arial” . We have also added a image to our background using background image.
*
{
    margin: 0;
    padding: 0;
  overflow: hidden;
}

html,body
{
    width: 100%;
    height: 100%;
}

body
{
    font-family: arial;
    background-image: url(https://www.teahub.io/photos/full/8-80224_blur-image-for-youtube.jpg);
    background-size: cover;
}
Step2: We will now style our calculator’s main container. We’ve added “370px” and “500px” as width and height. The margin is set to “auto” with a margin-top of “30 px.” We also changed the border radius to “10 px,” the border colour to black, and added a box shadow to our main container.
Portfolio Website Using HTML CSS And JAVASCRIPT ( Source Code)
Now using the (.main_screen_container) we will add the width and height as “350px” and “480px” . We have also added the background image and we also set the overflow property to “hidden”.
.container
{
    padding-top: 1px;
}

.main_div_container
{
    width: 370px;
    height: 500px;
    margin: auto;
    margin-top: 30px;
    padding-top: 1px;
    border-radius: 10px;
    background-color: #000;
    box-shadow: 0px 25px 30px rgba(0, 0, 0, 0.5);
}

.main_screen_container
{
    width: 350px;
    height: 480px;
    margin: auto;
    margin-top: 10px;
    border-radius: 10px;
    background-image: url(https://images.unsplash.com/photo-1515462277126-2dd0c162007a?ixlib=rb-1.2.1&ixid=MnwxMjA3fDB8MHxzZWFyY2h8MXx8ZGFyayUyMHRoZW1lfGVufDB8fDB8fA%3D%3D&w=1000&q=80);
    background-size: cover;
    overflow: hidden; }
Step3: We will now style the heading container and heading. The background colour is “white,” and the text is centred.
We’ll style our input container now by setting its width to 95% and padding to 20px. We also set the font size to “20px.”
.user_input_container
{
    width: 95%;
    padding: 20px 5px;
    color: #fff;
    font-size: 20px;
}

.dob_tile,.date_tile
{
    width: 47%;
    display: inline-block;
    vertical-align: top;
}

#date,#today_date
{
    width: 48%;
    height: 20px;
    padding: 5px;
    border: none;
    background-color: #fff;
    display: inline-block;
    vertical-align: top;
}
Step4: We will style our button with the (.btn) class. The width is “120 px,” the padding is “10 px,” and the background colour is “red.” The pointer was set as the cursor. In addition, we use the text shadow property to give our button text shadow.
We also used a hover selector to add the hover property to our button.
.btn
{
    width: 120px;
    padding: 10px;
    margin-top: 10px;
    margin-left: 32%;
    border: none;
    cursor: pointer;
    border-radius: 5px;
    color: #fff;
    background-color: #ff4e00;
    border: 2px solid #ff4e00;
    box-shadow: 0px 0px 10px rgba(0, 0, 100, 0.2), inset 0px 0px 10px rgba(0, 0, 100, 0.2);
    transition: all 0.2s;
}

.btn:hover
{
    box-shadow: 0px 0px 10px rgba(0, 0, 100, 0.4), inset 0px 0px 10px rgba(0, 0, 100, 0.2);
}

.btn:active
{
    box-shadow: 0px 0px 10px rgba(0, 0, 100, 0.2), inset 0px 0px 10px rgba(0, 0, 100, 0.4);
    transform: scale(0.99);
}
Step5: Now we will create two sections, one to show the calculated result of our age and the other to show the next birthday time. We made the width 50% and the height 160 px. The font weight has been changed to “bold.” The display mode is “inline-block.” The alignment has been set to “vertical.”
.age_main_big_container
{
    width: 94.5%;
    height: 160px;
    margin-top: 30px;
    border: 1px solid #ff4e00;
    padding: 10px 2.5%;
    font-weight: bold;
}

.left_side_div_age_list,.right_side_div_age_list
{
    width: 49.1%;
    height: 100%;/*
    background: green;*/
    color: #fff;
    border: 1px solid #ff4e00;
    box-sizing: border-box;
    display: inline-block;
    vertical-align: top;
    background-color: rgba(0, 0, 0, 0.7);
}

.left_side_div_age_list div:nth-child(1)
{
    font-size: 30px;
    padding: 10px;
}

.left_side_div_age_list div:nth-child(2)
{
    margin: 0;
}

.left_side_div_age_list div:nth-child(3)
{
    margin: 20px 4px;
    opacity: 0;
    transition: all 0.2s;
}

.right_side_div_age_list
{
    text-align: center;
}

.right_side_div_age_list div:nth-child(1)
{
    color: #ff4e00;
    padding: 10px 0;
}

.right_side_div_age_list #n_b
{
    margin-top: 26px;
    opacity: 0;
    transition: all 0.2s;
}

.right_side_div_age_list img
{
    width: 50px;
}

#year
{
    font-size: 40px;
    color: #ff4e00;
    margin: 10px;
    margin-right: 15px;
}

#month
{

}

#day
{

}
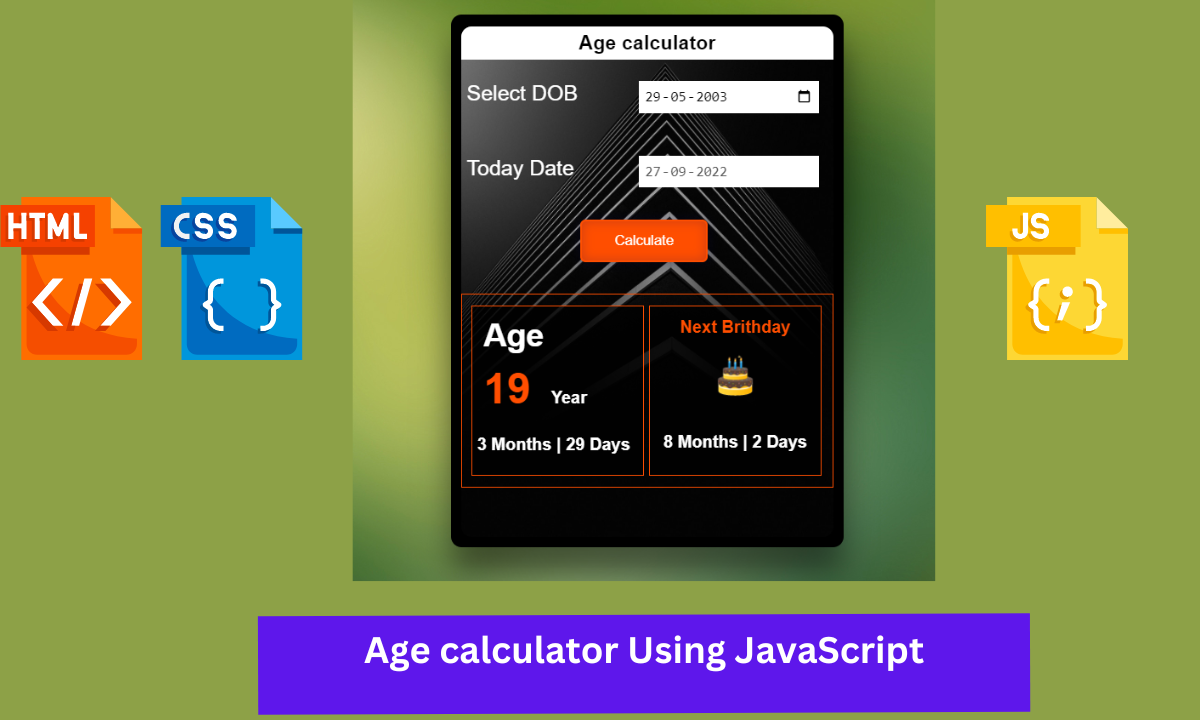
Now we have completed our css code and below👇here is the output after styling our webpage.

Step3: javascript code For Age Calculator
Even after applying the CSS and HTML, our button does not work and does not calculate our age. This is due to the fact that functionalities to any HTML element can only be added through Javascript, and we have not yet added Javascript code.
Ecommerce Website Using Html Css And Javascript Source Code
ADVERTISEMENT
When I click the button, we’ll use some fundamental Javascript concepts to tag and style the element with JS.
ADVERTISEMENT
const months = [31,28,31,30,31,30,31,31,30,31,30,31];
const selectedDiv = document.getElementById('year');
const selectedDiv1 = document.getElementById('month');
const selectedDiv2 = document.getElementById('day');
const selectedDiv3 = document.getElementById('month1');
const selectedDiv4 = document.getElementById('day1');
const op = document.getElementById('m_d');
const op1 = document.getElementById('n_b');
console.log(new Date().getMonth());
let currentYear = new Date().getFullYear();
let currentMonth = new Date().getMonth()+1;
let currentDate = new Date().getDate();
if (currentDate<10)
{
    currentDate="0"+currentDate;
}
if (currentMonth<10)
{
    currentMonth="0"+currentMonth;
}
document.getElementById('today_date').value = currentYear+"-"+currentMonth+"-"+currentDate;
function ageCalculate()
{
    let myBirth = document.getElementById("date").value;
    let today = new Date();
    let currentYear = today.getFullYear();
    let currentMonth = today.getMonth()+1;
    let currentDate = today.getDate();
    if (myBirth!="")
    {
        let inputDate = new Date(myBirth);
        let birthMonth,birthDate,birthYear;
        let birthDetails = {date:inputDate.getDate(),month:inputDate.getMonth()+1,year:inputDate.getFullYear()}
        if(currentYear % 4 === 0 || (currentYear % 100 === 0 && currentYear % 400 === 0))
        {
            months[1] = 29;
        }
        else{
            months[1] = 28;
        }
        birthYear = currentYear - birthDetails.year;
        if(currentMonth >= birthDetails.month)
        {
            birthMonth = currentMonth - birthDetails.month;
        }
        else
        {
            birthYear--;
            birthMonth = 12 + currentMonth - birthDetails.month;
        }
        if(currentDate >= birthDetails.date)
        {
            birthDate = currentDate - birthDetails.date;
        }
        else
        {
            birthMonth--;
            let days = months[currentMonth - 2];
            birthDate = days + currentDate - birthDetails.date;
            if(birthMonth < 0)
            {
                birthMonth = 11;
                birthYear--;
            }
        }
        selectedDiv.innerText = birthYear;
        selectedDiv1.innerText = birthMonth;
        selectedDiv2.innerText = birthDate;
        selectedDiv3.innerText = 11 - birthMonth;
        selectedDiv4.innerText = months[currentMonth] - birthDate;
        op.style.opacity = '1';
        op1.style.opacity = '1';
    }
}
First of all we will create an array of number of days of every month and will store their value under the month variable.
ADVERTISEMENT
Using the document.getELementById selector to select the html and storing their value into the new variables.
ADVERTISEMENT
We obtained the device’s time and date by using the new Date () function. New Date is a JavaScript function for retrieving current dates from your device. These three variables, which basically indicate the current time, are determined by currentYear ,currentDate ,CurrentMonth.
ADVERTISEMENT
Now we will create a conditional statement if the value of our current month is less than the 10 it will add that value to the current date
Now we’ll write a function called ageCalculate() and use the if else condition statement to calculate the age difference between the date of birth and the current date. Then we simply insert those values into our html element.
We now have the functionality to our age calculator . Let’s watch a quick video to see how it works.
Output:
Now We have Successfully created the Simple Age Calculator using Javascript . You can use this project directly by copying into your IDE. WE hope you understood the project , If you any doubt feel free to comment!!
If you find out this Blog helpful, then make sure to search code with random on google for Front End Projects with Source codes and make sure to Follow the Code with Random Instagram page.


