Html Css Card Subscribe | Subscribe Newsletter Card Html and Css
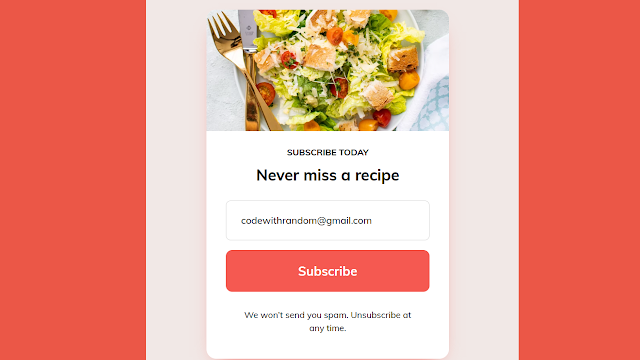
Welcome🎉 to Code With Random blog. In this blog, we learn how to create a Subscribe Newsletter Card. We use HTML & CSS for Subscribe Newsletter Card. Hope you enjoy our blog so let’s start with a basic HTML structure for the Subscribe Newsletter Card.
HTML code
 <head>
   <meta charset="UTF-8">
   <meta name="viewport" content="width=device-width, initial-scale=1.0">
   <title>Suscribe</title>
   <!-- Reset styles -->
   <link rel="stylesheet" href="https://unpkg.com/modern-css-reset/dist/reset.min.css" />
   <!-- Google Fonts Muli -->
   <link href="https://fonts.googleapis.com/css2?family=Muli:wght@300;400;700&display=swap" rel="stylesheet">
   <link rel="stylesheet" href="styles.css">
 </head>
 <body>
   <section class="wrapper">
     <div class="container">
       <div class="img__container">
       <img src="https://images.unsplash.com/photo-1546793665-c74683f339c1?ixlib=rb-1.2.1&ixid=eyJhcHBfaWQiOjEyMDd9&auto=format&fit=crop&w=634&q=80" alt="salad" class="img">
     </div>
       <div class="content">
         <h2 class="subtitle">Subscribe today</h2>
         <h1 class="title">Never miss a recipe</h1>
         <input type="text" class="mail" placeholder="Your email address" name="mail" required>
         <input type="submit" value="Subscribe" class="subscribe">
         <p class="text">We won’t send you spam. Unsubscribe at any time.</p>
       </div>
     </div>
   </section>
 </body>
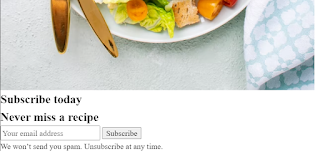
There is all HTML code for the Subscribe Newsletter Card. Now, you can see output without CSS, then we write CSS for the Subscribe Newsletter Card.
 .wrapper {
  min-height: 100vh;
  color: #000;
  font-family: 'Muli', sans-serif;
  font-size: 1rem;
  background-color: #F1E8E6;
  display: -ms-grid;
  display: grid;
  place-items: center;
 }
 .container {
  background-color: #fff;
  padding: 1em;
  border-radius: 1em;
  max-width: 768px;
  display: -ms-grid;
  display: grid;
  place-items: center;
  -webkit-box-shadow: 0px 17px 34px -20px #f55951;
      box-shadow: 0px 17px 34px -20px #f55951;
 }
 .title {
  font-size: 1.6rem;
  font-weight: 700;
 }
 .text {
  font-size: 1rem;
  margin-bottom: 0.8em;
 }
 .container {
  max-width: 400px;
  overflow: hidden;
  padding: 0;
 }
 .img {
  width: 100%;
  height: auto;
  border-radius: 1em 1em 0 0;
  -o-object-fit: cover;
    object-fit: cover;
  -webkit-transform: translateY(-50%);
      transform: translateY(-50%);
 }
 .img__container {
  height: 200px;
  overflow: hidden;
  margin-bottom: 1.5em;
 }
 .title {
  margin-bottom: 0.9em;
 }
 .subtitle {
  font-size: 0.9rem;
  text-transform: uppercase;
  margin-bottom: 0.5em;
  font-weight: 700;
 }
 .content {
  display: -ms-grid;
  display: grid;
  place-items: center;
  padding: 0 2em;
  margin-bottom: 1.8em;
 }
 .mail {
  padding: 0.5em 0 0.5em 1.5em;
  line-height: 3;
  width: 100%;
  border: 1px solid #d9d9d9;
  border-radius: 0.5em;
  margin-bottom: 1em;
 }
 ::-webkit-input-placeholder {
  color: #111127;
 }
 :-ms-input-placeholder {
  color: #111127;
 }
 ::-ms-input-placeholder {
  color: #111127;
 }
 ::placeholder {
  color: #111127;
 }
 .subscribe {
  color: #fff;
  font-size: 1.3rem;
  font-weight: 700;
  background-color: #f55951;
  padding: 0.9em 0;
  display: inline-block;
  border: none;
  border-radius: 0.5em;
  width: 100%;
  margin-bottom: 1.3em;
 }
 .text {
  font-size: 0.9rem;
  width: 90%;
  text-align: center;
 }


