Creating a Responsive Gym Website Using HTML ,CSS and JavaScript
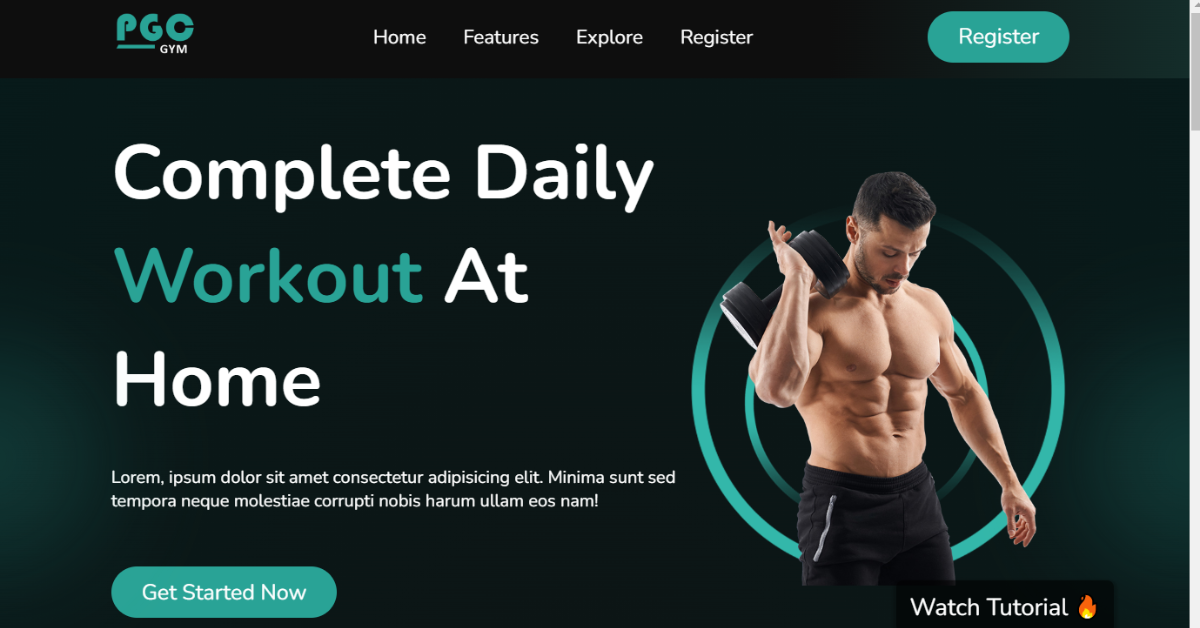
Hello Coder, You will discover how to create a Gym Website using HTML, CSS, and JavaScript in this article. This Is A Completely Responsive Gym Website Where User Find All The Details About Our Gym Center.
By the end of this article, you will be able to build your own website because we will be starting from scratch on this project and teaching you every HTML, CSS, and JavaScript concept.
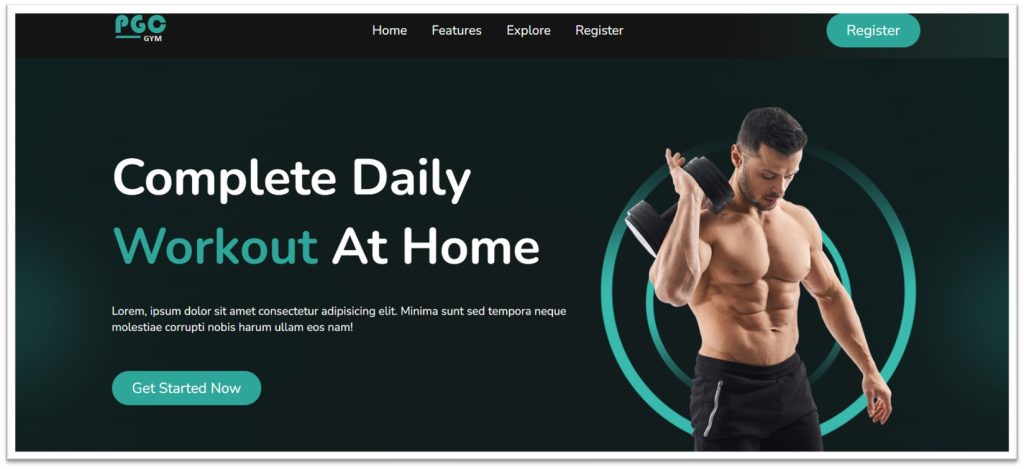
To lead a happy and long life, one must be physically and mentally fit. One of the best ways to maintain good health is through exercise. Therefore, no matter how busy you are, it is always best to find a workout routine. Many people are now aware of the value of exercise due to the prevalence of diseases today. The best exercise regimen will specifically benefit a person’s physical, mental, and social well-being.
50+ HTML, CSS & JavaScript Projects With Source Code
As a result, exercise will help you have more energy, lower your risk of developing chronic diseases, lose weight, and enhance your memory and brain function. With these benefits, working out will probably become enjoyable for you soon. Fortunately, you don’t have to do it on your own because a variety of personal trainers or certified fitness instructors offer the assistance you require. Additionally, enrolling in fitness classes is simple. Today, we will use HTML, CSS, and javascript to create our own gym website.
I hope you have a general idea of what the project entails. In our article, we will go over this project step by step.
Step1: Adding HTML Markup
<!DOCTYPE html>
<html lang="en">
<head>
<meta charset="UTF-8" />
<meta http-equiv="X-UA-Compatible" content="IE=edge" />
<meta name="viewport" content="width=device-width, initial-scale=1.0" />
<title>PGC-GYM Landing Page</title>
<!-- Ion Icons Js -->
<script type="module" src="https://cdn.jsdelivr.net/npm/@ionic/core/dist/ionic/ionic.esm.js"></script>
<script nomodule src="https://cdn.jsdelivr.net/npm/@ionic/core/dist/ionic/ionic.js"></script>
<!-- JS -->
<!-- CSS -->
<link rel="stylesheet" href="style.css" />
</head>
<body>
<!-- Menu -->
<div class="menu">
<div class="container flex">
<!-- Mobile Button -->
<div class="mobile-btn">
<ion-icon name="grid"></ion-icon>
</div>
<div class="logo">
<img src="https://raw.githubusercontent.com/programmercloud/pgc-gym/main/img/logo.png" alt="" />
</div>
<ul class="nav">
<li class="nav-item"><a href="#">Home</a></li>
<li class="nav-item"><a href="#why-us">Features</a></li>
<li class="nav-item"><a href="#explore">Explore</a></li>
<li class="nav-item"><a href="#discount">Register</a></li>
</ul>
<a href="#" class="btn">Register</a>
</div>
</div>
<!-- End Menu -->
<!-- Header -->
<header class="header">
<div class="container flex">
<div class="text">
<h1 class="mb">
Complete Daily <br />
<span>Workout</span> At Home
</h1>
<p class="mb">
Lorem, ipsum dolor sit amet consectetur adipisicing elit. Minima
sunt sed tempora neque molestiae corrupti nobis harum ullam eos nam!
</p>
<a href="#" class="btn mt">Get Started Now</a>
</div>
<div class="visual">
<img src="https://raw.githubusercontent.com/programmercloud/pgc-gym/main/img/banner-img.png" alt="" />
</div>
</div>
</header>
<!-- End Header -->
<!-- Why Us -->
<div class="section" id="why-us">
<div class="container flex">
<div class="text">
<h2 class="primary mb">Why Choose Us?</h2>
<h3 class="secondary mb">Consulatation with Expert.</h3>
<p class="tertiary">
Lorem, ipsum dolor sit amet consectetur adipisicing elit. Alias quos
maxime tempore?
</p>
<h3 class="secondary mb">Consulatation with Expert.</h3>
<p class="tertiary">
Lorem, ipsum dolor sit amet consectetur adipisicing elit. Alias quos
maxime tempore?
</p>
</div>
<div class="visual">
<img src="https://raw.githubusercontent.com/programmercloud/pgc-gym/main/img/why-us.png" alt="" />
</div>
</div>
</div>
<!-- End Why Us -->
<!-- Explore -->
<div class="section" id="explore">
<div class="container flex">
<div class="visual">
<img src="https://raw.githubusercontent.com/programmercloud/pgc-gym/main/img/explore.jpg" alt="" />
</div>
<div class="text">
<h2 class="primary mb">
Explore Our Fitness <br />
Studio
</h2>
<p class="tertiary mb">
Lorem ipsum dolor sit amet consectetur adipisicing elit. Perferendis
esse vitae ratione quos maiores eveniet temporibus illum! Eligendi
amet officia unde sint totam ut optio. Molestiae, illo quia?
</p>
<a href="#" class="btn mt">Get Started Now</a>
</div>
</div>
</div>
<!-- End Explore -->
<!-- Trainer -->
<div class="section" id="trainer">
<h2 class="primary mb">Our Professional Trainers</h2>
<div class="container flex">
<div class="trainer">
<img src="https://raw.githubusercontent.com/programmercloud/pgc-gym/main/img/trainer1.jpg" alt="" />
<h3 class="secondary mb">Alan Smith</h3>
<p class="tertiary mb">
Lorem ipsum dolor sit amet consectetur adipisicing elit. Nulla.
</p>
<a href="#" class="btn-2">
<ion-icon name="arrow-redo-circle-outline"></ion-icon>
</a>
</div>
<div class="trainer">
<img src="https://raw.githubusercontent.com/programmercloud/pgc-gym/main/img/trainer2.jpg" alt="" />
<h3 class="secondary mb">Alan Smith</h3>
<p class="tertiary mb">
Lorem ipsum dolor sit amet consectetur adipisicing elit. Nulla.
</p>
<a href="#" class="btn-2">
<ion-icon name="arrow-redo-circle-outline"></ion-icon>
</a>
</div>
<div class="trainer">
<img src="https://raw.githubusercontent.com/programmercloud/pgc-gym/main/img/trainer3.jpg" alt="" />
<h3 class="secondary mb">Alan Smith</h3>
<p class="tertiary mb">
Lorem ipsum dolor sit amet consectetur adipisicing elit. Nulla.
</p>
<a href="#" class="btn-2">
<ion-icon name="arrow-redo-circle-outline"></ion-icon>
</a>
</div>
</div>
</div>
<!-- End Trainer -->
<!-- Testimonial -->
<div class="section" id="testimonial">
<div class="container flex">
<div class="text">
<h2 class="primary">
That's What Our Super <br />
Client Says
</h2>
<br />
<br />
<br />
<div class="client">
<img src="https://raw.githubusercontent.com/programmercloud/pgc-gym/main/img/client1.jpg" alt="" />
<h2 class="secondary">Exelent Training</h2>
<p class="tertiary">
Lorem ipsum dolor sit amet consectetur adipisicing elit. Excepturi
quas voluptatem ad, repudiandae voluptates odio deleniti
reiciendis in veniam quidem expedita maxime error fugit. Pariatur
quasi sunt aut id. Lorem, ipsum dolor sit amet consectetur
adipisicing elit. Neque, officiis.
</p>
</div>
</div>
<div class="visual">
<img src="https://raw.githubusercontent.com/programmercloud/pgc-gym/main/img/testimonial.png" alt="" />
</div>
</div>
</div>
<!-- End Testimonial -->
<!-- Discount -->
<div class="section" id="discount">
<div class="container flex">
<div class="visual">
<img src="https://raw.githubusercontent.com/programmercloud/pgc-gym/main/img/discount.png" alt="" />
</div>
<div class="text">
<h2 class="primary mb">
Fitness Classes This Summer, Pay Now And Get 25% Discount
</h2>
<p class="tertiary mb">
Lorem ipsum dolor sit amet consectetur adipisicing elit. Ab maxime
minus praesentium est et veniam voluptate alias excepturi minima
placeat amet nostrum, eligendi, quod cum ducimus nesciunt ipsa eum,
explicabo eaque obcaecati.
</p>
<a href="#" class="btn bt">Book Now</a>
</div>
</div>
</div>
<!-- End Discount -->
<!-- Footer -->
<footer class="footer">
<div class="container flex">
<p class="tertiary">
© 2022 Programmer Cloud. All Rights Reserved.
</p>
</div>
</footer>
<!-- End Footer -->
<script src="script.js"></script>
</body>
</html>We will construct the fundamental framework for our gym website using HTML ideas, but first we must add some file links to our html file. Project management is essential while creating a project, and the simplest approach to manage is to make separate files for each language and then link them together inside our website.
Portfolio Website using HTML and CSS (Source Code)
The links for our external CSS file, the icons we’ll be utilizing on our website, and the link for our javascript file will all be included here, inside the head part of our HTML. We’ll also add links for those files before the end of the body tag.
//Head section
<!-- Ion Icons Js -->
    <script type="module" src="https://cdn.jsdelivr.net/npm/@ionic/core/dist/ionic/ionic.esm.js"></script>
    <script nomodule src="https://cdn.jsdelivr.net/npm/@ionic/core/dist/ionic/ionic.js"></script>
    <!-- JS -->
    <!-- CSS -->
    <link rel="stylesheet" href="style.css" />
//Body Section
    <script src="script.js"></script>
Navbar:
To add a navigation bar to our website, we will first create a div with the class “menu,” and then inside of that, using the img> tag, we will add our logo to the left side of the navbar, and inside of that, using the nav> tag, we will add various menu items to the navbar. Finally, we will create a link of menu items inside the navbar so that visitors can easily navigate our website with the help of the navbar.
Restaurant Website Using HTML and CSS
Header Section:
Now that we have added a header section using the header tag, we will add the main heading for our gym website using the <h1> tag inside of it. Next, using the paragraph tag, we will add a brief, snappy description of our website along with a get started now button using the <a>. In order to make our header more visually appealing, we will also include an image.
Portfolio Website Using HTML CSS And JAVASCRIPT ( Source Code)
Body Section :
We will now include sub-parts like the feature, explore, and trainer sections in our body section. We will now use the div element with various classes to construct those various sections, the <p> tag to add some text, and the img> tag to add photos to our website. In order to give your website a more appealing appearance, I would advise using more and more visuals. You can get an idea by simply glancing at our structure, and you should strive to use your own imagination to enhance the website.
Footer Section:
We will build a footer section with the footer tag and a div> section with the <div> tag. We will add the copyright icon and copyright content using the © tag, and the name of the person who designed the website using the <p> tag.
100+ HTML,CSS and JavaScript Projects With Source Code ( Beginners to Advanced)
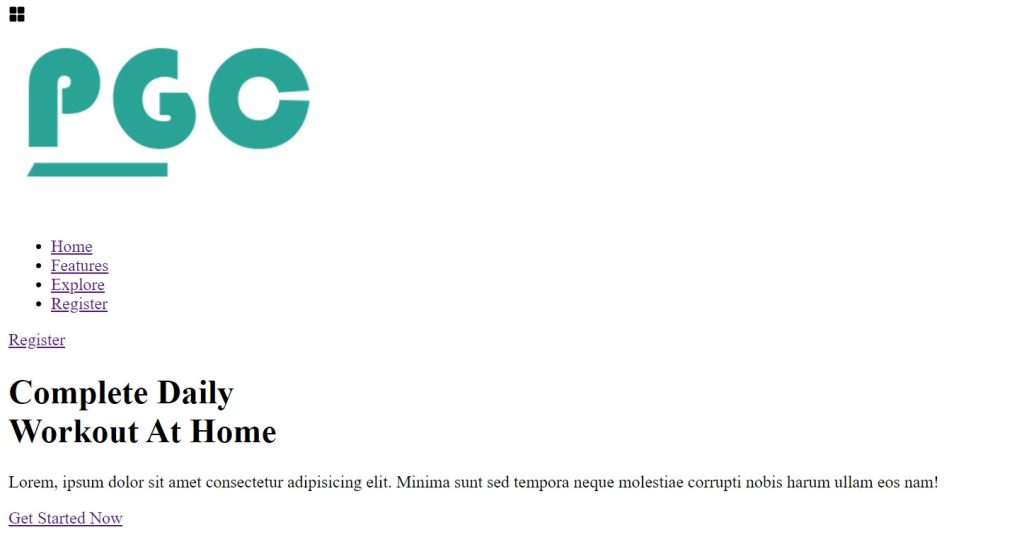
Let’s have a look at our webpage now that we’ve added structure.
Step2: Adding CSS Code
In your stylesheet, copy and paste the CSS code provided below.
@import url("https://fonts.googleapis.com/css2?family=Nunito:wght@200;400;500;700&display=swap");
/* Base */
:root {
  --clr-primary: #29a396;
}

*,
*::after,
*::before {
  box-sizing: border-box;
  padding: 0;
  margin: 0;
  font-family: "Nunito", sans-serif;
}

html {
  scroll-behavior: smooth;
}

body {
  width: 100%;
  min-height: 100vh;
  background: radial-gradient(#111, #071a1a);
  color: #fff;
  overflow-x: hidden;
}

.container {
  width: 80%;
  margin: 0 auto;
}

.flex {
  display: flex;
  align-items: center;
  justify-content: center;
}

.header,
.section {
  width: 100%;
  padding: 40px 0;
  overflow: hidden;
}

.header::after,
.header::before,
.section::after,
.section::before {
  content: "";
  background: url(https://raw.githubusercontent.com/programmercloud/pgc-gym/main/img/blur-1.png);
  position: absolute;
  width: 400px;
  height: 400px;
  background-position: center;
  background-repeat: no-repeat;
  background-size: contain;
  bottom: 0;
}

.header::after {
  left: -200px;
}

.header::before {
  right: -200px;
}

.mb {
  margin-bottom: 30px;
}

.mt {
  margin-top: 20px;
}

.section {
  background: #1d1f1e;
  position: relative;
  padding: 80px 0;
}

.section::after {
  left: -200px;
}

.section::before {
  width: 600px;
  right: -200px;
}

.section:nth-child(even) {
  background: #141615;
}

.section:nth-child(even)::after,
.section:nth-child(even)::before {
  display: none;
}

.primary {
  font-size: 35px;
  font-weight: 700;
}

.secondary {
  font-size: 25px;
  font-weight: 700;
}

.tertiary {
  font-size: 15px;
}
/* End Base */

/* Menu */
.menu {
  width: 100%;
  background: linear-gradient(to right, #0e0e0e 70%, #142d2a);
  padding: 12px 0;
}

.menu .container {
  justify-content: space-between;
}

.mobile-btn {
  display: none;
}

.logo {
  cursor: pointer;
}

.logo img {
  width: 80px;
  height: auto;
}

.nav {
  list-style: none;
}

.nav-item {
  display: inline-block;
  margin-right: 30px;
  font-size: 18px;
  font-weight: 400;
}

.nav-item a {
  text-decoration: none;
  color: #fff;
}

.nav-item:hover a {
  color: #29a396;
  transition: 0.3s linear;
}

.nav-item:last-of-type {
  margin-right: 0;
}
/* End Menu */

/* Buttons */
.btn {
  padding: 10px 28px;
  background: var(--clr-primary);
  border-radius: 40px;
  font-size: 20px;
  font-weight: 400;
  text-decoration: none;
  color: #fff;
  display: inline-block;
}

.btn:hover {
  background: #165f56;
  transition: 0.3s linear;
}

.btn-2 {
  font-size: 35px;
  text-decoration: none;
  color: #ccc;
  transition: 0.3s linear;
}

.btn-2:hover {
  color: #29a396;
}

/* End Buttons */

/* Header */
.text {
  width: 60%;
}

.visual {
  width: 40%;
}

.visual img {
  width: 100%;
}

.header h1 {
  font-size: 70px;
  font-weight: 700;
}

.header h1 span {
  color: var(--clr-primary);
}
/* End Header */

.section:nth-child(even) .visual {
  margin-right: 30px;
}

/* Trainer */
#trainer {
  text-align: center;
}

.trainer img {
  border-top-left-radius: 80px;
  border-top-right-radius: 20px;
  border-bottom-right-radius: 80px;
  border-bottom-left-radius: 20px;
  margin-bottom: 10px;
  outline: 2px solid #fff;
  padding: 14px;
}

.trainer .mb {
  margin-bottom: 10px;
}
/* End Trainer */

/* Testimonial */
#testimonial .visual img {
  width: 90%;
  display: block;
  margin-left: auto;
}

.client {
  background: #fff;
  color: #000;
  padding: 20px 10px;
  margin-right: 20px;
  text-align: center;
  border-radius: 20px;
  position: relative;
  margin-top: 20px;
}

.client img {
  width: 80px;
  height: 80px;
  border-radius: 50%;
  position: absolute;
  top: -40px;
  left: calc(50% - 40px);
}

.client h2 {
  margin: 20px 0 10px 0;
}
/* End Testimonial */

/* Discount */
#discount {
  padding: 40px 0;
}
/* End  Discount */

/* Footer */
.footer {
  padding: 30px 0;
  border-top: 1px solid #fff;
  text-align: center;
}
/* End Footer */

/* Responsive */

@media (max-width: 768px) {
  .flex {
    flex-direction: column;
    text-align: center;
  }

  .mobile-btn {
    display: block;
    font-size: 35px;
    cursor: pointer;
    position: absolute;
    right: 20px;
    top: 12px;
  }

  .menu.active .nav-item {
    display: block;
    margin: 30px 0;
  }

  .nav,
  .menu .btn {
    display: none;
  }

  .menu.active .nav,
  .menu.active .btn {
    display: block;
  }

  .menu.active {
    padding: 30px 0;
    width: 100%;
    transition: all 0.8s ease;
  }

  .text,
  .visual {
    width: 100%;
    margin-bottom: 20px;
  }

  .text h1 {
    font-size: 45px;
  }

  .primary {
    font-size: 28px;
  }

  .secondary {
    font-size: 22px;
  }

  .tertiary {
    font-size: 14px;
  }

  .trainer {
    margin-bottom: 20px;
  }

  .client {
    margin-bottom: 50px;
  }

  #discount .visual img {
    width: 70%;
    margin-bottom: 30px;
  }
}

@media (max-width: 530px) {
  .header::after,
  .header::before,
  .section::after,
  .section::before {
    display: none;
  }

  .primary {
    font-size: 25px;
  }

  .secondary {
    font-size: 20px;
  }

  .tertiary {
    font-size: 12px;
  }

  .text h1 {
    font-size: 34px;
  }

  .btn,
  .btn-2 {
    font-size: 16px;
  }
}

/* End Responsive */
Basic Styling:
The Google fonts will first be imported using the Google font import link, after which the padding and margin will be set to “zero” using the universal selector, and the box-sizing property will be used to change the box’s size to “border-box.”
Ecommerce Website Using HTML, CSS, & JavaScript (Source Code)
Now, inside the body, we will use the body tag selector to set the font family to “Nunito,” and the background is set as a gradient background. The width is 100%, and we’ll hide the overflow item by using the overflow property.
We will first set the width, height, background, margin, and padding of our main containers using the main classes, and then we will use classes to set the font size.
@import url("https://fonts.googleapis.com/css2?family=Nunito:wght@200;400;500;700&display=swap");
/* Base */
:root {
  --clr-primary: #29a396;
}

*,
*::after,
*::before {
  box-sizing: border-box;
  padding: 0;
  margin: 0;
  font-family: "Nunito", sans-serif;
}

html {
  scroll-behavior: smooth;
}

body {
  width: 100%;
  min-height: 100vh;
  background: radial-gradient(#111, #071a1a);
  color: #fff;
  overflow-x: hidden;
}

.container {
  width: 80%;
  margin: 0 auto;
}

.flex {
  display: flex;
  align-items: center;
  justify-content: center;
}

.header,
.section {
  width: 100%;
  padding: 40px 0;
  overflow: hidden;
}

.header::after,
.header::before,
.section::after,
.section::before {
  content: "";
  background: url(https://raw.githubusercontent.com/programmercloud/pgc-gym/main/img/blur-1.png);
  position: absolute;
  width: 400px;
  height: 400px;
  background-position: center;
  background-repeat: no-repeat;
  background-size: contain;
  bottom: 0;
}

.header::after {
  left: -200px;
}

.header::before {
  right: -200px;
}

.mb {
  margin-bottom: 30px;
}

.mt {
  margin-top: 20px;
}

.section {
  background: #1d1f1e;
  position: relative;
  padding: 80px 0;
}

.section::after {
  left: -200px;
}

.section::before {
  width: 600px;
  right: -200px;
}

.section:nth-child(even) {
  background: #141615;
}

.section:nth-child(even)::after,
.section:nth-child(even)::before {
  display: none;
}

.primary {
  font-size: 35px;
  font-weight: 700;
}

.secondary {
  font-size: 25px;
  font-weight: 700;
}

.tertiary {
  font-size: 15px;
}
/* End Base */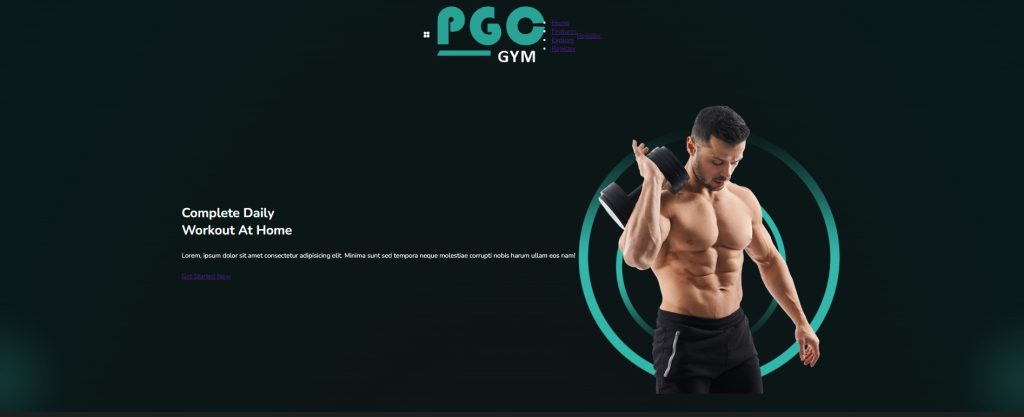
Styling Menu:
The width will now be set to 100% using the class selector “.menu,” and the background property will be used to create a linear gradient using the colours blue and black for the backdrop. Now that we have individually selected each element using the child class selector, we will set their width and height to match the navbar. In order to alter the font colour to green when the user hovers over the button, we will also add the hover property to the anchor elements.
Movie App using HTML, CSS, and Javascript
ADVERTISEMENT
/* Menu */
.menu {
  width: 100%;
  background: linear-gradient(to right, #0e0e0e 70%, #142d2a);
  padding: 12px 0;
}

.menu .container {
  justify-content: space-between;
}

.mobile-btn {
  display: none;
}

.logo {
  cursor: pointer;
}

.logo img {
  width: 80px;
  height: auto;
}

.nav {
  list-style: none;
}

.nav-item {
  display: inline-block;
  margin-right: 30px;
  font-size: 18px;
  font-weight: 400;
}

.nav-item a {
  text-decoration: none;
  color: #fff;
}

.nav-item:hover a {
  color: #29a396;
  transition: 0.3s linear;
}

.nav-item:last-of-type {
  margin-right: 0;
}
/* End Menu */

ADVERTISEMENT
Styling button & Header:
ADVERTISEMENT
We will provide our website’s button padding, a background colour that we will inherit from the root colour, a border radius of 40 px using the background radius property, and all of these features utilising the class selector (.btn). Our button’s font size is set to 20 pixels. In order to modify the background colour when the button is hovered over, we will also add the hover property.
ADVERTISEMENT
Animated Login Form Using HTML and CSS (Source Code)
ADVERTISEMENT
The styling will also be added to our header section using the class selector. The classes will be used to select the header element individually, and their width and colour will be adjusted accordingly.
/* Buttons */
.btn {
  padding: 10px 28px;
  background: var(--clr-primary);
  border-radius: 40px;
  font-size: 20px;
  font-weight: 400;
  text-decoration: none;
  color: #fff;
  display: inline-block;
}

.btn:hover {
  background: #165f56;
  transition: 0.3s linear;
}

.btn-2 {
  font-size: 35px;
  text-decoration: none;
  color: #ccc;
  transition: 0.3s linear;
}

.btn-2:hover {
  color: #29a396;
}

/* End Buttons */

/* Header */
.text {
  width: 60%;
}

.visual {
  width: 40%;
}

.visual img {
  width: 100%;
}

.header h1 {
  font-size: 70px;
  font-weight: 700;
}

.header h1 span {
  color: var(--clr-primary);
}
/* End Header */

.section:nth-child(even) .visual {
  margin-right: 30px;
}
Styling Trainer & Testimonial Section:
The majority of what we added to our trainer and testimonial are images, so we will now style our testimonial using the id selector (#trainer). We’ll align the text to the “center” and add borders with radii of 80 pixels on the left and right and 20 pixels on the top and bottom using the tag selector (img).
Create Gmail Clone Template Using HTML and CSS (Gmail Template)
The styling will also be added to the images, and we will use the class selector to set the margin to the left, display to block, and width to 90%.
/* Trainer */
#trainer {
  text-align: center;
}

.trainer img {
  border-top-left-radius: 80px;
  border-top-right-radius: 20px;
  border-bottom-right-radius: 80px;
  border-bottom-left-radius: 20px;
  margin-bottom: 10px;
  outline: 2px solid #fff;
  padding: 14px;
}

.trainer .mb {
  margin-bottom: 10px;
}
/* End Trainer */

/* Testimonial */
#testimonial .visual img {
  width: 90%;
  display: block;
  margin-left: auto;
}

.client {
  background: #fff;
  color: #000;
  padding: 20px 10px;
  margin-right: 20px;
  text-align: center;
  border-radius: 20px;
  position: relative;
  margin-top: 20px;
}

.client img {
  width: 80px;
  height: 80px;
  border-radius: 50%;
  position: absolute;
  top: -40px;
  left: calc(50% - 40px);
}

.client h2 {
  margin: 20px 0 10px 0;
}
/* End Testimonial */
Styling footer & Responsiveness
We’ll give our footer some padding, and we’ll use the border property to add a top border that is 1 px solid and white in color. The text will be centred using the text-align property, and if the screen size is less than or equal to the screen size, the maximum width will be set using the media query property. The HTML elements will then be adjusted to fit the website’s specified size for our gym.
/* Footer */
.footer {
  padding: 30px 0;
  border-top: 1px solid #fff;
  text-align: center;
}
/* End Footer */

/* Responsive */

@media (max-width: 768px) {
  .flex {
    flex-direction: column;
    text-align: center;
  }

  .mobile-btn {
    display: block;
    font-size: 35px;
    cursor: pointer;
    position: absolute;
    right: 20px;
    top: 12px;
  }

  .menu.active .nav-item {
    display: block;
    margin: 30px 0;
  }

  .nav,
  .menu .btn {
    display: none;
  }

  .menu.active .nav,
  .menu.active .btn {
    display: block;
  }

  .menu.active {
    padding: 30px 0;
    width: 100%;
    transition: all 0.8s ease;
  }

  .text,
  .visual {
    width: 100%;
    margin-bottom: 20px;
  }

  .text h1 {
    font-size: 45px;
  }

  .primary {
    font-size: 28px;
  }

  .secondary {
    font-size: 22px;
  }

  .tertiary {
    font-size: 14px;
  }

  .trainer {
    margin-bottom: 20px;
  }

  .client {
    margin-bottom: 50px;
  }

  #discount .visual img {
    width: 70%;
    margin-bottom: 30px;
  }
}

@media (max-width: 530px) {
  .header::after,
  .header::before,
  .section::after,
  .section::before {
    display: none;
  }

  .primary {
    font-size: 25px;
  }

  .secondary {
    font-size: 20px;
  }

  .tertiary {
    font-size: 12px;
  }

  .text h1 {
    font-size: 34px;
  }

  .btn,
  .btn-2 {
    font-size: 16px;
  }
}

/* End Responsive */
Step3: Adding Javascript
//Js
document.querySelector(".mobile-btn").addEventListener("click", function () {
  document.querySelector(".menu").classList.toggle("active");
});
Using the document.queryselector() function, we will first select the HTML elements inside of our javascript, and then, using the addEventlistener method, we will add a click event as soon as the user presses the button. If a user clicks on an item in our menu when the class is active, we will remove the class from the menu.
Create Color Guessing Game Using JavaScript (Source Code)
Now we’ve completed our Gym Website using Html ,Css and JavaScript. I hope you understood the whole project. Let’s take a look at our Live Preview.
Final Output Of Gym Website Project:
Live Preview Of our Gym Website Using HTML ,CSS & JavaScript Code
Now We have Successfully created our Gym Website Using HTML, CSS & JavaScript.You can use this project directly by copying into your IDE. We hope you understood the project, If you have any doubts feel free to comment!!
If you find out this Blog helpful, then make sure to search code random on google for Front End Projects with Source codes and make sure to Follow the Code with Random Instagram page.
What is the purpose of making gym website?
The majority of the generation uses the internet, so building a website for a gym allows them to learn more about it and take a virtual tour of it is the primary justification for doing so.
What other websites can be created using HTML ,CSS and Javascript?
Almost every website is created using html css and javascript so you can also create website like ecommerce , tour and travels, online reservations etc.
![15+ Read More Button Examples [ Demo + Code ] Read more about the article 15+ Read More Button Examples [ Demo + Code ]](https://www.codewithrandom.com/wp-content/uploads/2022/11/codewithrandom35-300x157.png)
